 |
| A cute little store front in Lancaster PA. |
Wednesday, August 31, 2011
Tuesday, August 30, 2011
Happy Monday! oops, I mean Tuesday!


I spent some time outside today. I thought the sun might give me a boost of energy. But I think all the weekds in my flowers zapped even more out of me. I hope that's the last time I have to weed this year.
When I came in I found my bananas not looking so pretty so I made a batch of Banana Blueberry muffins. They smell yummy! And look good too!

2/3 cup milk
1/4 cup vegetable oil
1/2 cup mashed very ripe banana (1 medium)
1 egg
2 cups cake flour
2/3 cup sugar
2 1/2 teaspoons baking powder
1/4 teaspoon ground nutmeg
1 cup fresh or frozen (thawed and well drained) blueberries
1. Heat oven to 400ºF. Place paper baking cup in each of 12 regular-size muffin cups, or grease bottoms only.
2. In large bowl, mix milk, oil, banana and egg with fork. Stir in remaining ingredients except blueberries just until flour is moistened. (Muffin batter should be lumpy. If you overmix the batter, muffins will be tough and have pointed, rather than rounded, tops.) Gently stir in blueberries. Divide batter evenly among muffin cups (cups will be almost full). Sprinkle with sugar if desired ( I use the sugar crystals and it gives them a nice crunch and shine)
3. Bake 18 to 20 minutes or until golden brown. Immediately remove from pan.
Enjoy!
Wednesday, August 24, 2011


Hiking with Basic Grey Out of Print.
I'm working on some pages for my daughters summer 2011 album. She spent a day hiking at Ricketts Glen State park. It's a beautiful area with huge waterfalls, but the walk can be quite slippery when the rocks are went. Luckily they had a beautiful day and managed to make the entire climb. I'm so bummed I only have a few pics my daughter took of herself because her boyfriend said the camera looks expensive and he didn't want to break it! Ack! He now has a lesson on how to use the camera, and it's really much better for them to come home with her Momma having lots of fun photos to scrap. LOL
This page is with the wonderful new Basic Grey Out Of Print from the Studio Calico August kit. Which is fabulous!


 It actually looks much brighter in person, more like the close ups. I love how the page turned out.
I think this will be my last post until after CK Scrap and Play in Lancaster this weekend. I hope to return with lots to share, and or at least lots of fun photos from the weekend. See you then!
This page is with the wonderful new Basic Grey Out Of Print from the Studio Calico August kit. Which is fabulous!


I think this will be my last post until after CK Scrap and Play in Lancaster this weekend. I hope to return with lots to share, and or at least lots of fun photos from the weekend. See you then!
Tuesday, August 23, 2011
New Camera Strap
I love instant gratifcation! And this is one easy project to give you just that. Tonight I was looking at my material and just thought my camera could use a strap cover before going to CK Scrap and Play next weekend. A girl's camera's gotta be all dressed up to hang with the girls, right!? (My husband says he is going to have to buy a new camera if he wants to take picture now).


OK, so my camer is finally dressed for summer and fall is on it's way, but I figure I'll get at least a month out of this design. If you would like a camera strap just send me an email with your choice of color and I'll put one together for you. I'll be putting some on my Etsy shop as I get them made. They will sell for around $12. shipping included.


OK, so my camer is finally dressed for summer and fall is on it's way, but I figure I'll get at least a month out of this design. If you would like a camera strap just send me an email with your choice of color and I'll put one together for you. I'll be putting some on my Etsy shop as I get them made. They will sell for around $12. shipping included.
Monday, August 22, 2011
Pre made Summer Mini


Sunday, August 21, 2011
Sunday sharing.
Hello everyone, hope your having a fabulous day! I sure am. Very minimal house work and some scrappytime. Not to mention newly polished finger and toe nails. Can't beat that!
If your looking for something to do next weekend come on over to My Scraps & More and help say Goodbye to Summer! It's a perfect time to get those summer photos from your camera to your scrapbooks. Stop over and join in on all the fun and inspiration. I'll be checking in from CK Scrap and Play in Lancaster. Hope to see you there:)

 And this is my page.
If your looking for something to do next weekend come on over to My Scraps & More and help say Goodbye to Summer! It's a perfect time to get those summer photos from your camera to your scrapbooks. Stop over and join in on all the fun and inspiration. I'll be checking in from CK Scrap and Play in Lancaster. Hope to see you there:)

I actually have some art to share today as well. I received my first Studio Calico kit this week and couldn't wait to jump right in. Everything about the kits are fabulous. From the box they ship them in to the empherma cards that are included with the kits. (I know it's advertising on their part, but for me, they make perfect embellishments and are like getting a sneak peak of their new lines! Way cool!)
So I took on the Sunday sketch from the SC blog, the sketch is based on a page by Stephanie Howell and the sketch was created by Nicole S.

There was so much fun stuff in this kit. Let me try to tell you what all I used.
The background paper is Sassafrass. It's so darn cute and comes with a decorative trim across the bottom so you can even use what is normall salvage. Very cool!
Starting at the top left circle, I used a Martha Stewart Scalloped circle punch to punch from a post card that was included in the kit. Next from the Tide Pool add on I used Batic from BG with "Ashlyn" letters from exclusive SC Sassafrass letters. Then mroe Batic form BG along with a BG Out for Print glazed brads.
Next I used the Pink Paislee mistables and MME twine to make this gathered flower. Then I misted it with Bell Bottom Jeans Tattered Angels Mist. To the top right, I used another one of the Batic and the Lime Twist Spring Twine from MME to make this cute little embellishment. Next is a punched circle from a post card that was in the kit. Logan is on a BG Batik and the last batik I stamped with versamark with the SC frame stamp and then heat embossed with Enamelz Molten Metal. I used SC Teal song and BG Out of Print Mish Mash under the photos. Lastly I misted the FACE letters (Pink Paislee Mistables) with various mists and finished the page with an American Krafts adhesive chalk lables.
And that's my share for this fabulous Sunday afternoon, have a great week!
Sunday, August 7, 2011
PTI Princess Challenge
I haven't been feeling well but have managed to make a few cards this week. This cherry ice cream cone was for a note in a card kit swap. I not only made this card, but have sent it out already. I combined the Papertrey Princesses challenge along with the Monochromatic challenge at For The Love of Art.


Saturday, August 6, 2011
Unity Blog Challenge
I love the Unity Stamps and how the coordinate with some of my favorite papers. Isn't this snowman cute coupled with this months Unity Blog Challenge to use cirecles.
 Supplies:
Cardstock- Papertrey Ink and Coordinations
Patterned Paper- Jilly Bean Soup
Stamps- Unity Jilly Bean Soup
Ribbon-offray
Punch- Martha Stewart
other-sewing

Cardstock- Papertrey Ink and Coordinations
Patterned Paper- Jilly Bean Soup
Stamps- Unity Jilly Bean Soup
Ribbon-offray
Punch- Martha Stewart
other-sewing
Tuesday, August 2, 2011
When does all else stop...
When you get to blog your very first Paper Crafts Magazine cover! I'm so excited!
 That's me in the middle, Full Moon Morsels! How cool is that!

Paper Secrets Design Team!
Hello everyone,
I happy to announce I'll be joining the Paper Secrets Design Team for the next few months. We have tons of fun things planned for you. This month is chocked full of fun challenges with lots of inspiration from the new team. And next month we will be right on top of fall festivities with a back to school blog hop with tons of prizes. Be sure to stop by and join me in my first challenge.
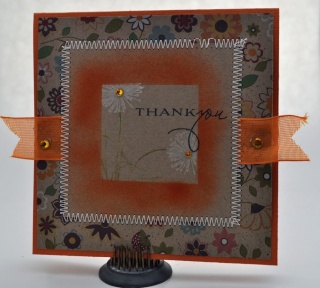
Masking is one of my all time favorite techniques. You can use masking with so many different mediums. I challenge you to make your own mask and use masking in a unique way on your card, page or altered item. Your mask can be as simple as punching circles and using the negative for your back ground or more intricut fussy cut or machine cut mask. I woul love to see you use both the positive and negative of your mask on your project. I can't wait to see how you use masking.

For this card I created a simple square mask to use. First I used the small square in the center and my copic air brush to add some orange color to the kraft cardstock. Then I used the larger square around the outside to stamp my images. You can use repositional tape to hold your mask in place.
Entries are due by August 31st, 11:59 PST
Be sure to add the keyword "tech6" to your gallery upload
Uploading your entry by the due date will get you one entry in a drawing to win 1 of 4 $10 Gift Cards!
Can't wait to see your projects!
I happy to announce I'll be joining the Paper Secrets Design Team for the next few months. We have tons of fun things planned for you. This month is chocked full of fun challenges with lots of inspiration from the new team. And next month we will be right on top of fall festivities with a back to school blog hop with tons of prizes. Be sure to stop by and join me in my first challenge.
Masking is one of my all time favorite techniques. You can use masking with so many different mediums. I challenge you to make your own mask and use masking in a unique way on your card, page or altered item. Your mask can be as simple as punching circles and using the negative for your back ground or more intricut fussy cut or machine cut mask. I woul love to see you use both the positive and negative of your mask on your project. I can't wait to see how you use masking.
For this card I created a simple square mask to use. First I used the small square in the center and my copic air brush to add some orange color to the kraft cardstock. Then I used the larger square around the outside to stamp my images. You can use repositional tape to hold your mask in place.
Entries are due by August 31st, 11:59 PST
Be sure to add the keyword "tech6" to your gallery upload
Uploading your entry by the due date will get you one entry in a drawing to win 1 of 4 $10 Gift Cards!
Can't wait to see your projects!
Sunday, July 31, 2011
Have taken on custom orders?
I spent the last few days making tags for wedding ceter pieces and adding them to my Etsy shop. I love stamping and take any opportunity to add items to my shop. In addition to adding these tags to my shop I also am making things for a craft fair and yard sale next month. It's kept me busy the last few days. But I know it will be well worth the efforts.
These are the tags for the wedding. They will be tied on mason jars that will hold daisies for the centerpieces. The perfect centerpiece for a country outdoor wedding.
 The are in my etsy shop so be sure to stop by and take a look.
These are the tags for the wedding. They will be tied on mason jars that will hold daisies for the centerpieces. The perfect centerpiece for a country outdoor wedding.

Tuesday, July 26, 2011
Nook inspiration...
I started a scrappy frenzy on Friday when I got to gether with Ellen and Andrea. They are so full of scrappy inspiration it just spills out of them. Anyway it seem I brought some home with me because I've been diving in ever since. Today Ingrid posted a new sketch for this week at The Nook. I didn't just make one card from the fabulous sketch I made 4 and a matching tag.


 |
| This is a group shot of the cards. |


 |
| I tied them all togehter with this cute little matching tag. Product: Cardstock- Papertrey Ink Patterned Paper- Melissa Frances Stamps- Flourishes Trim- Melissa Frances |
Monday, July 25, 2011
Papertrey Ink July 2011 Blog Hop
Hello everyone!
Hope your week is starting off wonderful. I've been busy getting ready for my first craft fair/yard sale at our local fire company on August 20th. I've done some more purging and hope to sell some things for some extra funds for the CK Scrap and Play in Lancaster the last weekend of August. Anybody going?
Today's challenge is a photo inspiration challenge. This is the photo from the PTI blog:
 And this is my project. I made a little gift set of 4 matching cards for different ocaisions. I used the glasine bags for envelped and tied them with a pretty orange bow.
Hope your week is starting off wonderful. I've been busy getting ready for my first craft fair/yard sale at our local fire company on August 20th. I've done some more purging and hope to sell some things for some extra funds for the CK Scrap and Play in Lancaster the last weekend of August. Anybody going?
Today's challenge is a photo inspiration challenge. This is the photo from the PTI blog:
 |
| Cardstock: Papertrey Ink Patterned Paper: Glitz Twine: Papertrey Ink Button: Papertrey Ink Stamps: Papertey Ink Inks: Momento, Stampin Up |
Saturday, July 23, 2011
SAF 9 & 10

Challenge 10-
SAF 7 & 8 ( scroll down for details)
Challenge-Your challenge is to have a "play date" with your stamps and discover 2 or 3 images from different sets that layer together in a surprising way, just like Betsy did here!

I used beautiful blooms and kissed the flower with the smaller doilies. Sorry you can't see it better, it looks better irl.
Challenge 8-I thought I would challenge you to create a card with an front cover that is cut back by an inch or so. The extra lip invites you to add a sentiment, a strip of patterned paper, a bit of glitter, just so many opportunities!

SAF 6 (scroll down for details)
Challenge-Your challenge this afternoon is to use the little notch technique to hold twine or ribbon in place across the cover of your project. You can use a circle punch of any diameter to create a round notch or a square punch for a square notch. There's lots of options for this one!

PTI SAF challenges continued....
Challenge 5-Your challenge is to take a solid shape, just like she did, and create your own custom "faux" border!

PTI SAF continued....
Challenge 4- I thought it would be fun to do a color challenge for this go-around! Papertrey colors you would use are represented as Ripe Avocado, Simply Chartreuse, Hawaiian Shores & Enchanted Evening.


Papertey Ink SAF!
It would be so nice to be stamping with all my PTI friends at the first PTI Stamp A Faire, but I didn't get registered beore they all sold out! It must be a fantastic day though. I know I had fun yesterday stamping with my local friends, and I continue the fun today doing some of the PTI challenges posted on Nicoles blog today.
The first challenge (taken from the PTI blog) :
Create a project featuring patterned strips that are created with some of your favorite decorative elements.
Challenge 3- Punch a window from you card cover and tie ribbon or twine from the window to the side of your card. There is SO much opportunity to have fun with your creativity on this one!
 I loved how this die looked for a very natural look. I had to punch holes on each side of the stem to attach the button. Everything I used here is PTI.
The first challenge (taken from the PTI blog) :
Create a project featuring patterned strips that are created with some of your favorite decorative elements.
 |
| It's Your Day Cardstock- PTI Patterned Paper- Basic Grey Embellishments-Basic Grey Sentiment- PTI Fillable Frames #8 |
The Second Challenge: We would love to see YOUR take on pairing up a hot pink, like Raspberry Fizz, with a charcoal grey (like Smokey Shadow). The interpretation of these colors is completely open, o feel free to interject any type of style you like!
Removed for publication! See Cards Feb. 2012!Challenge 3- Punch a window from you card cover and tie ribbon or twine from the window to the side of your card. There is SO much opportunity to have fun with your creativity on this one!

Subscribe to:
Posts (Atom)